Why Your Outdoor Hose Bibb Leaks Indoors When You Turn It Off
Why Your Outdoor Hose Bibb Leaks Indoors When You Turn It Off
The Late-Summer Mystery of the Indoor Hose Bibb Leak
You step outside into the warm yard, hook up the sprinkler for some August late-summer watering, and turn the outdoor faucet on full blast to revive the dry grass. Everything seems perfectly normal on the exterior of the house, but an hour later, you discover a massive puddle forming inside your basement or crawlspace. If you are wondering why your outdoor hose bibb leaks indoors when you turn it off, the answer usually traces back to a hidden mechanical failure that actually occurred months ago. This is not a random pipe burst or a sudden failure of your home's main water line. Instead, it is a highly specific plumbing issue caused by a delayed reaction from the previous winter. Because the damage is located deep inside the wall cavity, resolving this mystery requires professional attention to assess the structural moisture and complete a proper, code-compliant fix.
When you need expert plumbing services to resolve hidden wall leaks safely, our team at Allied Plumbing Heating & Cooling is ready to provide the right plumbing repair. We see this exact late-summer scenario play out in countless Springfield homes as families prep their yards for the back-to-school season, and we know exactly how to fix it.
The frustration of this specific leak lies in its deceptive nature. Homeowners often assume that if an outdoor faucet is broken, it will spray water outside. However, because of the way modern exterior plumbing is designed to survive freezing temperatures, the actual break happens inside the house. The water meter typically will not spin when the faucet is turned off, which adds to the confusion. It is only when you actively demand water for your garden that the hidden split in the pipe is pressurized, sending gallons of water pouring down your interior drywall or foundation walls.
Understanding the Mechanics of a Frost-Free Sillcock
To understand why the water is pooling in your basement instead of spraying in your yard, you first need to understand the counter-intuitive design of modern outdoor plumbing. In colder climates, standard outdoor faucets have largely been replaced by a specialized fixture known as a frost-free sillcock. A frost-free sillcock is engineered to prevent freezing by keeping the actual water supply safely inside the heated envelope of your home, far away from the freezing outdoor air.
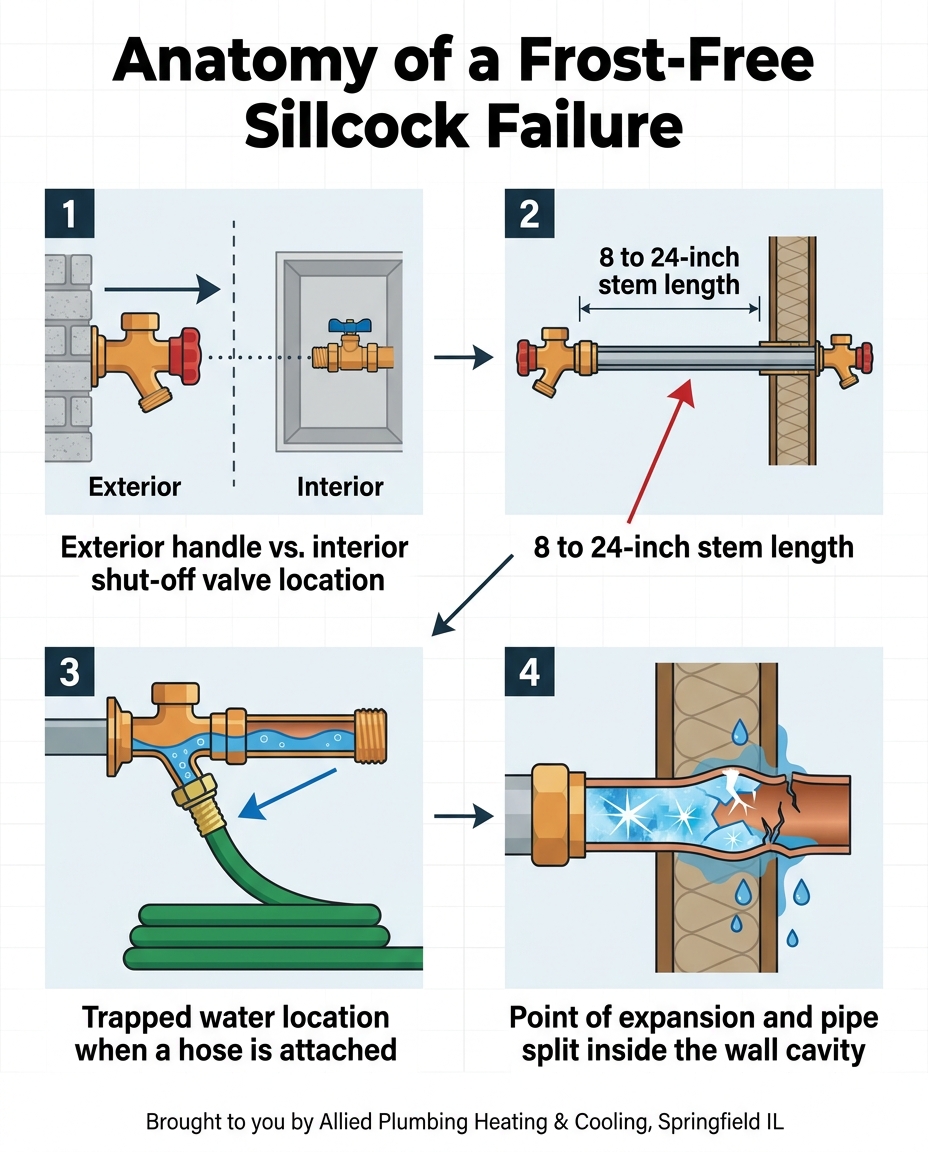
When you look at the exterior of your house, you see a handle and a spout. However, that handle is merely the end of a long control rod. The visible handle outside is connected to a long copper or brass stem that is typically 8 to 24 inches long, depending on the thickness of your home's walls. The actual shut-off valve—the mechanism that stops the flow of water—is located at the very end of this long stem, deep inside the warmth of your basement or crawlspace.
Where the Water Actually Stops
The fundamental principle of a frost-free sillcock is that the pipe between the exterior wall and the interior valve is meant to remain completely empty during freezing weather. When you turn the exterior handle to the "off" position, the valve deep inside the house closes off the water supply. Any residual water left in the 8-to-24-inch stem is designed to drain out through the exterior spout by gravity.
• Valve Location — Standard Faucet: Right at the exterior wall — Frost-Free Sillcock: 8 to 24 inches inside the home
• Water Storage — Standard Faucet: Holds water right up to the outside handle — Frost-Free Sillcock: Stem remains empty when turned off
• Freeze Vulnerability — Standard Faucet: Highly vulnerable to freezing without interior shut-off — Frost-Free Sillcock: Protected, provided it can drain properly
This design normally works flawlessly to protect your home. Because the water stops inside the warm house, the empty metal tube passing through the cold exterior wall cannot freeze. However, this entire protective system relies on one crucial factor: the water must be able to drain out of the stem freely when the valve is closed.
Why Leaving a Hose Attached Causes Hidden Winter Damage
The root cause of your late-summer indoor leak actually happened during a deep freeze months prior. Springfield IL's harsh, freezing winter temperatures make frost-free bibbs essential for protecting your plumbing, but these fixtures become highly vulnerable if a simple mistake is made in the fall: leaving a garden hose attached. When a hose is left threaded onto the spout, it acts as a vacuum seal and physically blocks the residual water from draining out of the long stem.
In our years of repairing frost-free fixtures across Springfield IL, our team at Allied Plumbing Heating & Cooling routinely traces the hidden winter damage back to this exact sequence of events inside local homes with basements or crawlspaces:
1. The water is trapped: You turn off the faucet in the fall, but the attached garden hose prevents the 8-to-24-inch stem from draining. The stem remains full of water, bridging the gap between the warm interior and the freezing exterior.
2. The temperature drops: A harsh winter cold snap hits. The cold temperature travels down the trapped water inside the stem, causing it to freeze solid.
3. The physics of expansion: Water expands by approximately 9 percent when it freezes. Because the ice has nowhere to go, it creates immense internal pressure against the walls of the copper or brass stem.
4. The pipe splits: The immense pressure of the expanding ice eventually forces the metal to give way. The stem splits open. Because the stem is 8 to 24 inches long, this split almost always occurs behind the exterior wall, directly inside your basement or crawlspace cavity.
At this point, the pipe is completely broken, but you will not notice any damage immediately because the ice acts as a temporary plug, and the interior shut-off valve is still holding the main water pressure back.
Anatomy of a Frost-Free Sillcock Failure
The Delayed Reaction: Why the Leak Only Happens When Turned On
The most confusing part of this plumbing failure is the delayed reaction. Homeowners often ask why a pipe that burst in January does not start leaking until August. The answer lies in the exact location of the split relative to the interior shut-off valve of the frost-free sillcock.
The split is located after the valve: The crack in the copper or brass stem happens between the interior shut-off valve and the exterior spout.
When the faucet is off: For the entire winter and spring, as long as the exterior handle remains in the "off" position, the interior valve remains tightly closed. This closed valve holds back the pressurized water from your home's main supply. The split section of the pipe is simply sitting empty and unpressurized inside your wall. There is no water flowing through it, which means there is no leak to discover.
When the faucet is turned on: The mystery is finally revealed during heavy watering seasons. When you turn the outside handle to water your lawn, you open the interior valve. Pressurized water rushes past the valve and into the long stem, intending to exit through the spout. However, the water encounters the hidden split in the pipe along the way. Because water always takes the path of least resistance, a significant portion of it sprays violently out of the split, directly into your wall cavity, rim joist, or basement.
This is why the damage goes completely unnoticed until you actively try to use the fixture for a prolonged period, exposing the hidden winter split with a sudden influx of pressurized water.
Spotting Water Damage in Basements and Crawlspaces
Because this leak occurs hidden behind walls and above ceilings, the resulting water damage can be extensive before it is finally noticed. Springfield IL homes with basements or crawlspaces are particularly susceptible to secondary structural issues if the water is allowed to sit. Identifying the extent of the moisture is critical for protecting your property.
When our Allied Plumbing Heating & Cooling technicians arrive to inspect a suspected split sillcock, we look closely for these signs of hidden water leaks in the immediate area behind the outdoor faucet:
• Pooling water along the rim joist: Check the wooden framing where the house meets the foundation. Water often runs along the top of the concrete foundation wall before dripping down.
• Stained or sagging basement ceilings: If your basement is finished, look for expanding brown water stains or bubbling drywall paint on the ceiling directly below the outdoor faucet.
• Damp, heavy fiberglass insulation: Insulation acts like a sponge. If the pink or yellow fiberglass batts stuffed into your rim joist are dark, heavy, or dripping, there is an active leak above them.
• Musty odors in the crawlspace: Prolonged moisture in an enclosed space quickly leads to mold and mildew growth. A sudden musty smell often precedes visible water damage.
• Deteriorating structural wood: If the leak has occurred briefly over several seasons before being fully discovered, the wooden sill plate may show signs of soft rot or structural deterioration.
Drying out the area immediately is paramount. Set up fans and dehumidifiers to pull moisture out of the wood framing and drywall. Secondary damage, such as mold growth and wood rot, can escalate rapidly if the wall cavity is left damp.
Immediate Steps to Mitigate the Leak
Discovering water pouring into your home during August late-summer watering is a stressful event, but taking quick, deliberate action can stop the flow and minimize property damage. It is vital to stop the water without attempting dangerous DIY repairs that could worsen the situation.
Follow these immediate steps to mitigate the leak safely:
1. Turn off the outdoor faucet handle immediately: Go back outside and turn the hose bibb handle to the fully closed position. Because the split is located after the interior valve, shutting off the faucet will immediately stop the flow of water into your wall cavity.
2. Locate and shut off the interior isolation valve: For added security, go into your basement or crawlspace and trace the pipe leading to the outdoor faucet. Most modern plumbing systems have a dedicated interior isolation valve (a supply valve) on this specific line. Turn this valve clockwise or perpendicular to the pipe to shut off the water supply to the sillcock entirely.
3. Clean up standing water: Use a wet/dry vacuum, old towels, and mops to remove any standing water from your basement floor. Remove any soaked cardboard boxes or stored items from the area to prevent permanent damage.
4. Expose the damp area: If the leak occurred behind finished drywall or above a drop ceiling, you may need to carefully remove ceiling tiles or open a small inspection hole in the drywall to allow air circulation and assess the wet framing.
5. Do not attempt to cut pipes or solder: Clearly state to yourself and your family that this is where your intervention ends. Do not attempt to cut into the copper lines or use a blowtorch inside a tight wall cavity to remove the broken fixture.
The Dangers of DIY Wall-Cavity Plumbing Repairs
While replacing a standard outdoor spigot might seem like a straightforward weekend project, replacing a split frost-free sillcock is strictly a job for a licensed professional. The unique challenges of working inside a wall cavity make this a high-risk repair for an untrained homeowner.
Removing the broken sillcock requires accessing incredibly tight wall cavities, often maneuvering around electrical wires, HVAC ductwork, and structural framing. The existing fixture is usually sweated (soldered) onto the home's main copper water lines. Attempting to unsweat and resolder copper pipes inside a wooden wall cavity using an open-flame propane torch is a massive fire hazard. A single mistake can easily ignite dry wooden studs, old insulation, or hidden dust, turning a plumbing leak into a catastrophic house fire. Furthermore, if a DIY solder joint fails under pressure, you risk a major interior flood the moment you turn the main water back on.
Beyond the immediate safety risks, proper installation technique is critical to prevent the exact same failure from happening next winter. When installing a new frost-free sillcock, the long stem must be pitched slightly downward toward the exterior. This precise gravity pitch ensures that when the valve is turned off, the residual water flows out of the spout rather than pooling backward into the stem. Relying on our experienced Springfield area plumbers at Allied Plumbing Heating & Cooling means benefiting from precise, local expertise. Our professional team understands exactly how to pitch the new bibb downward correctly, ensuring the installation is fully code-compliant and properly winter-ready to protect your home from future Midwest freeze damage.
Frequently Asked Questions
Why is my outdoor faucet leaking inside the house? Your outdoor faucet is leaking inside because the long metal stem of the frost-free sillcock froze and split during the winter. The split is located behind the exterior wall, so when you turn the water on, it sprays out of the cracked pipe directly into your basement or wall cavity instead of flowing out the spout.
What happens if you leave a hose connected to a frost-free faucet in winter? Leaving a hose connected traps water inside the faucet's long stem, preventing it from draining properly. When freezing temperatures hit, this trapped water turns to ice, expands by roughly 9 percent, and creates enough internal pressure to split the copper or brass pipe wide open.
Can a frost free faucet freeze? Yes, a frost-free faucet can freeze if it is installed without the proper downward pitch or if a garden hose is left attached during freezing weather. While they are designed to drain and remain empty, any trapped water inside the fixture will freeze and cause severe damage.
How do you fix a frost-free sillcock that leaks inside the wall? Fixing a frost-free sillcock that leaks inside the wall requires cutting out the damaged fixture from the interior plumbing lines and soldering or adapting a brand-new unit in its place. Because this involves working with specialized tools and open flames inside tight, combustible wall cavities, it must be handled by a licensed professional plumber.
How long does a frost-free hose bibb typically last? A properly installed frost-free hose bibb can easily last 15 to 20 years or more under normal conditions. However, their lifespan is instantly cut short if a hose is left attached during a deep freeze, which will destroy even a brand-new fixture in a single season.
Discovering water pouring into your basement is incredibly stressful, but understanding the mechanical failure behind it is the first step toward a permanent solution. By shutting off your interior isolation valve immediately, you can stop the damage in its tracks. When you are ready for a safe, code-compliant replacement, our team ensures your new fixture is correctly pitched and installed, giving you the confidence that your home is fully protected against the next harsh winter.
For expert assistance, reach out for professional plumbing repair today.
Comparing Prepaid HVAC Maintenance Agreements vs A La Carte Fall Tune-Ups
October 3, 2026
Treat heating maintenance as more than a simple transaction. Weigh the long-term benefits of an ongoing service plan against a one-off furnace check before the first winter freeze hits.
Treat heating maintenance as more than a simple transaction. Weigh the long-term benefits of an ongoing service plan against a one-off furnace check before the first winter freeze hits.