


Why Your Water Heater Needs an Expansion Tank
Expansion tank installation is a critical safety upgrade protecting your home’s plumbing from dangerous pressure buildup. When water heats, it expands. In modern homes with backflow preventers, this expanding water has nowhere to go.
Quick Installation Overview:
- Turn off water and power to the water heater
- Install a tee-fitting on the cold water line
- Set the tank’s air pressure to match your home’s water pressure
- Connect the tank using proper fittings and support
- Test for leaks and proper operation
Without an expansion tank, this pressure can damage fixtures, cause the Temperature and Pressure (T&P) relief valve to drip, or even lead to pipe failure. A dripping T&P valve is a clear sign that thermal expansion is overwhelming the system.
Modern homes especially need expansion tanks because they typically have:
- Backflow prevention valves in water softeners
- Pressure regulating valves
- Check valves in water meters
These devices create a “closed system.” The expansion tank acts as a relief system, using a rubber bladder to absorb the extra water volume.
Installing an expansion tank is often required by local building codes and prevents costly plumbing damage.

Understanding the Basics Before You Start
Before starting your expansion tank installation, understand what you’re working with. A thermal expansion tank is a small guardian for your plumbing system. This tank connects to your cold water supply line to manage pressure spikes from your water heater.
When water heats, it expands. In homes with backflow preventers, this water needs an escape route. Without an expansion tank, your pipes and fixtures are at risk from high pressure.
Many local plumbing codes now require expansion tanks, especially with new water heaters or backflow prevention devices. This is smart protection for your investment. Fortunately, expansion tank installation is more straightforward now, with clearer manufacturer guidelines for proper upright installation.

Getting your tank size right is crucial. For most homes with 40-50 gallon water heaters, a 2-gallon expansion tank is appropriate. A crucial step many DIYers miss is checking the home’s water pressure first.
Use a pressure gauge on an outdoor spigot to find your home’s water pressure. This number is critical, as the tank’s air pressure must match it exactly. Most homes are 50-100 PSI. If yours is over 80 PSI, consider a pressure-reducing valve.
The installation process is similar for all different types of water heaters. Both gas and electric models benefit from an expansion tank in a closed system. Electric water heaters particularly need this protection. Even tankless water heaters can benefit, as thermal expansion still occurs in supply lines.
How a Thermal Expansion Tank Works
Inside the tank, a flexible rubber bladder divides it into two chambers: one for air, one for water. This simple design solves a potentially expensive problem.

When water heats and expands, the excess flows into the tank’s water chamber. This pushes the rubber bladder, compressing the air on the other side. This air cushion absorbs the extra volume and pressure.
When you use hot water, the pressure drops. The compressed air then pushes water back into the system, keeping it stable. It’s like a shock absorber for your plumbing, preventing damage from pressure buildups.
Tools and Supplies You’ll Need
For a smooth expansion tank installation, gather all your tools and supplies upfront.
Your essential toolkit includes the expansion tank, adjustable wrenches or a pipe wrench, and a pressure gauge. You’ll also need an air compressor or bicycle pump to set the tank’s pre-charge pressure.
For secure connections, use both Teflon tape and pipe dope. You’ll need a tee-fitting matching your cold water line (usually 3/4-inch) and a short piece of copper pipe or PEX.
Also, have a dielectric union (to prevent corrosion when connecting different metals), necessary adapters, and a bucket. A mounting bracket is highly recommended, as a full tank can weigh over 20 pounds.
A Complete Guide to Expansion Tank Installation
Now, let’s tackle the “how.” Expansion tank installation can be a satisfying DIY project for those comfortable with basic plumbing, but proper preparation is key.

Safety first. Water heaters involve high temperatures and pressure. Always shut off the power: flip the circuit breaker for electric models or turn the gas valve to “pilot” or “off” for gas units.
Next, shut off the main water supply. Then, drain your water heater to relieve pressure. To drain, attach a garden hose to the drain valve and run it outside or to a floor drain. Open an upstairs hot water faucet to break the vacuum and allow the tank to drain.
For folks who learn better by watching, there’s a helpful video of the process that walks through these steps visually.
Step 1: Prepare the Cold Water Line
The expansion tank always connects to the cold water supply line (usually marked blue), never the hot side. This intercepts water before it’s heated.
Locate the cold water inlet and measure where to install the tee-fitting, ensuring enough space. Use a pipe cutter for copper or a PEX cutter for PEX to make clean cuts. You can use solder, compression fittings, or push-fit connections like SharkBite for the tee.
A key step: use a dielectric union when connecting copper piping to a steel inlet to prevent galvanic corrosion. We often replace old unions during installation.
Consider adding a shut-off valve on the branch to the tank. This simplifies future replacement. Keep the connecting pipe short (around 6 inches) to minimize stress.
Step 2: Pre-Charge the Expansion Tank
This is a critical step where many DIY installations fail. The tank’s factory pre-charge (often 20-40 PSI) likely doesn’t match your home’s water pressure.
Check your home’s water pressure first with a pressure gauge on an outdoor spigot.

Find the Schrader valve (like a tire valve). Crucially, adjust the pressure only when the tank is empty and disconnected from the plumbing, otherwise the reading will be inaccurate.
Use an air compressor or bicycle pump to increase pressure or press the center pin to decrease pressure. Match your home’s water pressure exactly.
Why is this vital? If the pre-charge is too low, the tank becomes waterlogged. If too high, it won’t absorb enough pressure. Either way, it fails to protect your system.
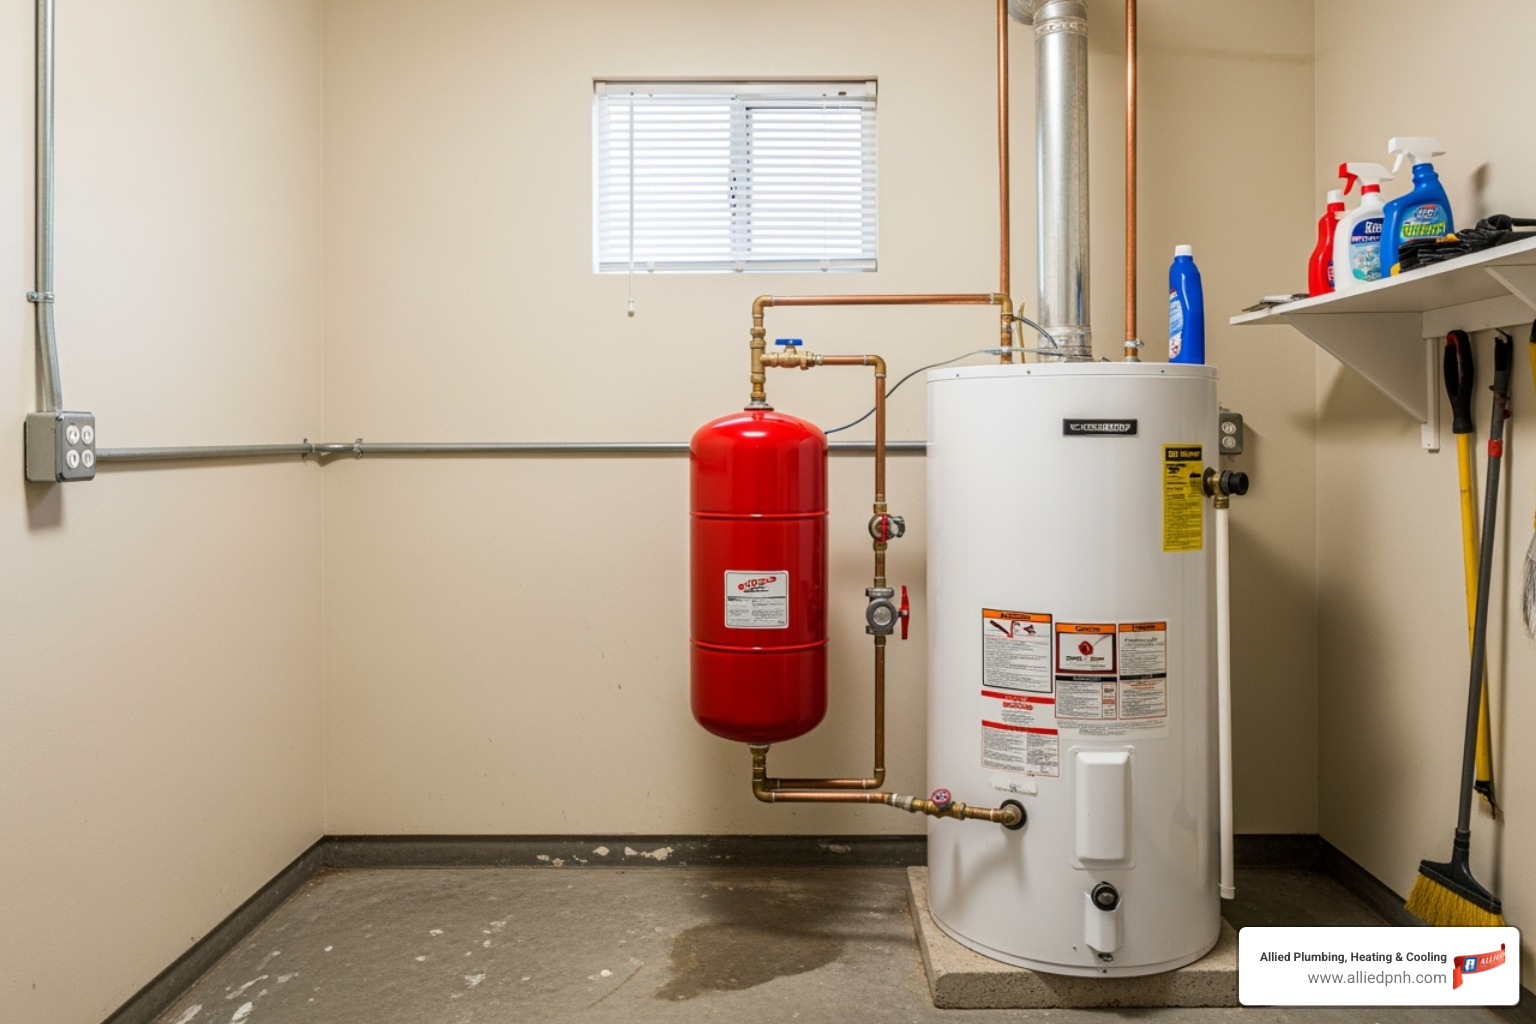
Step 3: Mount the Tank
Proper mounting is crucial for preventing stress on your plumbing and ensuring the tank works correctly long-term.
Vertical installation (connection at the top) is the standard. It minimizes stress and prevents trapped air. If you must install horizontally, the tank must be fully supported, not just hanging from the pipes.
A full tank can weigh over 20 pounds, stressing fittings. Apply thread sealant: use 2-3 clockwise wraps of Teflon tape, followed by a thin layer of pipe dope for a reliable seal.
Connect to the tee-fitting, hand-tightening first, then snugging with a wrench. Do not overtighten, as this can damage the threads.
Independent support is key. Use a dedicated mounting bracket like the HoldRite Quick Strap Expansion Tank Mounting Bracket or a support strap. For horizontal mounting, a clevis hanger is a good option.
Position the tank at least 18 inches from a gas water heater’s vent and inlet. Install it between the water heater shutoff valve and the tank’s inlet. The tank should be solidly supported, not stressing the pipes.
Post-Installation Checks and Long-Term Maintenance
After your expansion tank installation, the final steps are checking your work and understanding maintenance.
Slowly turn the water back on. Listen for any unusual noises. Then, bleed air from the system by opening the highest hot water faucet until the water flows smoothly. Sputtering is normal as air escapes.
Once water flows smoothly, turn the power back on to the water heater (flip the breaker or turn the gas valve to “on”).
Carefully inspect all new connections for leaks. A small drip can become a big problem. Gently tighten any weeping connections, but don’t overtighten.
Monitor your T&P valve. It should no longer drip from thermal expansion. If it does, there may be another issue or the tank’s pre-charge could be wrong.

Thermal expansion tanks typically last five to ten years. Regular checks help them perform optimally. For concerns about your water heater, our guide on Signs you need water heater repair can help.
How to Know if Your Tank is Working Correctly
After expansion tank installation, confirm it’s working with these simple tests.
- The tap test: A working tank sounds hollow when tapped on its upper portion. A dull, solid sound indicates it’s waterlogged, meaning the bladder has failed.
- Temperature check: The upper air chamber portion should feel cool to the touch. If the whole tank is warm, it may be waterlogged.
- The air valve test: Press the valve stem. If air comes out, the bladder is intact. If water comes out, the bladder has ruptured and the tank has failed.
Signs of a failing tank include condensation, leaks, or a dripping T&P valve. Strange noises like banging could also be a symptom. Our article on Water Heater Makes Strange Noises can help diagnose sounds.
Common Problems and When to Replace Your Tank
Even with a perfect expansion tank installation, these parts eventually fail.
- Improper pre-charge pressure is a common problem. If the pressure doesn’t match your home’s water pressure, the tank won’t work efficiently.
- Leaking fittings can develop from poor seals or corrosion.
- A waterlogged tank is the most common failure. The internal bladder ruptures, filling the tank with water and making it useless.
- Corrosion can lead to leaks and tank failure.
Replace the tank immediately if water comes from the air valve. A constant T&P valve drip or visible leaks/rust also means it’s time for a replacement.
Consider proactive replacement if your tank is near or past its 5-10 year lifespan. An annual check of the pre-charge and a visual inspection can catch problems early. For more tips, see our guide on Expert tips on maintaining your water heater.
Frequently Asked Questions about Expansion Tanks
Here are answers to common questions about expansion tank installation.
What pressure should my expansion tank be set to?
The tank’s air pressure must exactly match your home’s water supply pressure. Most homes are 50-70 PSI, but you must test yours with a pressure gauge before installation. If your home’s pressure is 60 PSI, set the tank to 60 PSI. Never set the air pre-charge above 80 PSI; if your home’s pressure is higher, install a pressure-reducing valve first.
Can an expansion tank be installed horizontally?
Yes, but horizontal installation is not recommended. Vertical installation with the connection at the top is always best, as it reduces stress on pipes and works more effectively. If you must install it horizontally, properly support the tank’s weight with a mounting bracket or strap. A full tank can weigh over 20 pounds and shouldn’t hang from the pipes.
What are the risks of not having an expansion tank?
Without an expansion tank, thermal expansion creates dangerous pressure spikes in a closed system, which can damage the weakest part of your plumbing. A common sign is a constantly dripping T&P relief valve. This valve isn’t designed for constant thermal expansion and will eventually fail. High pressure also damages faucets, appliances, pipe joints, and the water heater itself, leading to premature failure and the need for a Water Heater Replacement.
Is DIY or Professional Installation Right for You?
After reviewing the steps for expansion tank installation, you might feel ready for a DIY project. If you’re experienced with plumbing, this can be a satisfying and cost-effective job.
However, this is more complex than minor plumbing repairs. You’re working with pressurized water lines and installing a critical safety device. A small mistake can lead to a big, expensive headache.
Assess your comfort with soldering, supporting heavy parts, and understanding pressure systems. Do you have the right tools and experience? If you have any doubts, it’s wise to reconsider.
Consider calling in the pros if you:
- Have never worked with water supply lines before
- Don’t own the specialized tools needed
- Feel uncertain about any step in the process
- Want the job done quickly without the learning curve
- Prefer having someone to call if something goes wrong later
We’ve seen many DIY projects become emergency calls. A failed fitting can cause major water damage, which isn’t covered by manufacturer warranties if caused by improper installation.
Professional installation brings peace of mind. When Allied Plumbing, Heating & Cooling handles your expansion tank installation, you get our 180+ years of combined experience. We’ve served Springfield, Chatham, Rochester, and Pleasant Plains since 1977, ensuring correct installation every time.
Our licensed technicians use the right fittings, properly support the tank, and ensure everything meets local codes. Plus, you know who to call for future service.
If you’re facing any plumbing challenges or prefer an expert touch for your expansion tank installation, the licensed team at Allied Plumbing, Heating & Cooling is ready to ensure your system is safe and efficient. For expert service on all water heaters in Rochester, contact us today.